Tuesday, December 29, 2009

Bread pudding and poached pears


For a family holiday dinner I decided to branch out of my comfort zone for desserts. This is not generally a good idea for say, Thanksgiving dinner or _the_ Christmas dinner for your family, but since we had about 5 "Christmas Dinners" throughout the season I figured risking an utter disaster wouldn't "ruin Christmas." For this particular dinner the main course was take-out pizza, so I could spend my full culinary creative juices on these desserts.

The bread pudding sounded appropriate because I was also making homemade egg nog and the two share cream, eggs, nutmeg and bourbon for ingredients. So, basically, bread pudding is eggnog soaked bread. I found the recipe from a new cookbook I got for Christmas by the makers of Cooks Illustrated Magazine (which is fantastic, btw). The book does a great job of explaining why they chose to do things the way they do instead of just telling you what to do. I didn't want to go completely plain with the pudding, and they suggested you could add raisins, but I went with craisins, thinking the red color was slightly more festive looking and I just like them better.
To make bread pudding you make a custard mixture of eggs, cream and flavorings and then soak chunks of bread in this mixture and bake it.
The two tricky parts to the equation are the ratio of bread to custard and when to put it from the oven. I think the recipe did well on both accounts, although I went with their suggestion of weight for the bread, not volume. They said only 6 cups of bread cubed and when I measured that out it was clearly not enough, but the 12 oz of bread seemed right- it just came out to almost 12 cups in volume. That could be accounted for in a difference in size for the cubes and type of bread, which is why I think weight was a better way to know how much bread to use. It will look like you have way more liquid than you need, but the bread will soak it up and you want that, otherwise it won't be a custard in the end, it will be bread chunks that are moistened- more like french toast (although if you do french toast _really_ well, it should be more like bread pudding in the center of the toast).
Next came deciding when to pull it out of the oven. Too soon, and you have uncooked eggs. Too long, and you have a dried out dessert that isn't really a custard anymore. The book explained that you want it to "jiggle like a jello mold" when you pull it out. You want that wiggle room (ha!) when you take it out to account for carry-over cooking that continues to happen after it's on your counter. (Same thing if you take scrambled eggs out of the pan when they are done to your liking, they will be overdone by the time you take your first bite). This explanation of the finished product worked very well for me and the pudding was super moist and a serving of custardy goodness. I will definitely be making this again!

The poached pears came from a greeting card recipe that my mom sent me. I thought it would be a nice balance with the heaviness of the bread pudding (there's a lot of cream and eggs in that recipe). I have never poached fruit before, but have seen how elegant whole poached pears look in magazines for holiday tables. This recipe called for either red wine or cranberry juice to poach in and since the bread pudding had bourbon in it, I decided to go for the alcohol-free option for this dessert. I think it made for a sweeter result and the cranberry juice was a beautiful colored syrup on the finished product. I used a melon baller to take out the cores of the pears from underneath, peeled them, and put them in a pot just big enough to hold them all standing up. Pull the pears out of the cooking liquid when a knife goes easily through, but before they are mushy, then reduce the liquid to make a syrup for serving and voila! I had planned on keeping them whole because they look so nice standing up in a circle on the platter, but didn't think most guests would want a whole one (and there weren't quite enough to go around anyway), so I sliced them in half and served laying down. It still looked beautiful with the peels scattered about and the red syrup. This is a very simple, not too heavy (as long as you didn't put too much of my homemade whipped cream on it, that is) and very classy addition to dessert.

Friday, December 25, 2009

Christmas Dinner

Every family that celebrates this holiday has traditions and expectations for Christmas Dinner. My young family is just starting to make our own. This year was the first that we stayed home for the entire day and I had free reign for dinner. The diners would be my family plus Mema and Papa. When pondering the plethora of options for this task, I decided to bring some traditions from my childhood holidays and then craft the menu with practical sense in mind. Having a toddler and infant can mean for an unpredictable day, especially when excitement and presents are involved. Therefore, I did not want anything labor intensive (unless it could be done ahead of time) or temperature sensitive (so that timing could be fudged around). Here is what I came up with:

Appetizers
Crudite platter
Cheese and crackers

Main meal
Baked Ham
Orzo salad
Dinner rolls
Cottage cheese salad

Dessert
Chocolate mousse with fresh whipped cream

The apps don't need much introduction. Some store-bought (but fancy and fresh, not some ranch in a tub) dip and veggies are a no-brainer and add something healthy to boot. Cheese and crackers are easy, yummy, and always a big hit with my toddler.

For the main meal, I thought of ham for two reasons. 1) Erik went crazy for it when Papa made it for a family holiday party a couple weeks ago so I wanted to give him an encore 2) Ham is fully cooked when bought and takes no fuss to be table-ready PLUS it doesn't need to be piping hot to enjoy- in fact it may be better room temp.
I bought a butt-end portion that was NOT spiral sliced- all those cuts lead to drying if you heat the ham slowly in the oven. And really, how hard is it to slice some ham? Then I pondered options for boosting the flavor of my ham. I read some recipes for glazes, rubs, and even one involving Dr. Pepper by Alton Brown (which Erik REALLY wants me to try some day, but I can't stand that soda). In the end, I went on my own and made a glaze with some maple syrup and molasses. I scored the ham in a criss cross pattern and after rubbing that all over the ham, I added some brown sugar and put whole cloves in each intersection of my scoring. I put it in a 275 degree oven for an hour, then boosted it to 325 for another hour or so. Again, the meat is fully cooked, so really you just want to heat it through and get your additional elements doing what you want from them. (And if you use cloves- make sure to take them out before serving!)

The orzo salad idea came from my summer time discovery of a tomato/spinach/feta orzo salad that was a big hit. Sadly, Mema does not like feta, so I needed to change that out for something else. Then I thought of a tomato/basil/mozzarella salad and how great that would be with orzo- even includes Christmas colors as the other one did. I bought small balls of fresh mozzarella and sliced them. I used some tomatoes on the vine from my nice produce store that smelled nearly as good as Summer tomatoes and seeded and chopped them. Add some basil, olive oil, salt, pepper and a little fresh squeezed lemon juice and it was a delicious salad that was good at room temperature.

Cottage Cheese Salad
How is it I've written so many entries and haven't yet done cottage cheese salad? What the heck is cottage cheese salad? You're asking. Well. Let me tell you. This is a creation from Papa's mother (I believe- correct me if I'm wrong, Papa) and it is very simple. It's a tub of cottage cheese (I use lowfat because whole fat just scares me since you end up adding more fat to it, but please, not nonfat- the texture just isn't the same) with a couple tablespoons of mayonnaise, a handful of finely chopped celery, salt, pepper and a maybe a teaspoon of dried minced onion (the kind in the spice jar). It may sound strange, but it is GOOD! One of my favorite sides of all time, and ever present at all our family holidays.

Chocolate Mousse
Papa is the King of chocolate mousse. Seriously, ask anyone who has had his. I thought it was about time that I learn this craft. My friend Liza gave me these espresso dark chocolate chunks for baking when she visited and immediately I thought they would make a terrific mousse. I looked in my cookbooks and online for recipes until I found one by Tyler Florence that sounded good. If you search foodnetwork.com for his name and mousse it will come up. It was then that I realized chocolate mousse involves eating raw eggs. I'm pretty ok with raw egg whites because I make meringes and foams with them all the time, but raw egg yolk? This was a stretch for me. But really, there is no way to heat the yolk to the 160 degrees it needs to be considered cooked. Chocolate melts a little over 100, and much beyond that, will cease. The ickiness factor that had me worried was long forgotten when I tasted my creation :) It was nearly perfect. It was nearly, as good as Papa's. Although slightly hard to compare directly, simply because mine was espresso flavored with some Kahlua whereas he usually does some Grand Marnier if I'm not mistaken (again correct me!) so the flavor profiles are different- but I think I got the texture nearly dead on. A good mousse is perfectly smooth and light, but rich. It's heavenly. Especially topped with some fresh whipped cream (of course!).

Merry Christmas to all! I hope your tables were filled with joy.

Saturday, November 28, 2009

Experimenting with Pie


Happy Thanksgiving to all. Is there any better holiday for foodies, cooks, food lovers, etc? This year I did some pie experiments for two family dinners.

The first was pumpkin pie. Growing up we always had an apple pie and a pumpkin pie for Thanksgiving, and I always ate the apple. I don't know where I got it in my head that I didn't like pumpkin pie, but I have learned the error of my ways, and although I would still choose apple more often (at least MY apple pie ;)), I now greatly appreciate the pumpkin pie for it's sweet, custardy goodness.
First step to the pie was making the dough for the crust. I use a recipe from Martha Stewart (go to her site and search pate brisee or pie dough) that is butter, flour, sugar, salt and ice water. I love her method of mixing the dough in a food processor. It is super fast and once you've done it a couple times, you know exactly when to stop drizzling in the ice water. I split the dough, putting half in the freezer (since it's only a one-crust pie) and half in the fridge to chill for a half hour to an hour before rolling. After the rest time in the fridge, I got out the dough and checked my pumpkin pie recipe. I would like to take a moment to remind all cooks out there to READ THROUGH a recipe from start to finish before deciding you are ready to embark on the process. I had only read the ingredients for the pie and knew I had them all, but then when I wanted to put it together (about an hour before bedtime the night before the dinner) I read "press dough into pie dish and chill dough in the freezer for 1 hour before baking." Sigh. I went to bed.
The next morning I rolled out the crust. Having rested overnight instead of just an hour, it was a bit tougher to begin with, but soon warmed up just enough. I pressed it into the pie plate and put it in the freezer for an hour. Then I read "place aluminum foil on the dough and pie weights on to to cover the bottom." Argh! Pie weights?!?! (Once again, friends, READ THROUGH recipes.) I didn't have pie weights and remembered you could use dried beans instead... which I also didn't have. I called Papa for help and asked what do I do? For those unfamiliar- pie weights are used in the process of "blind baking" the crust, that is, baking the crust before adding the filling. If you don't weight the crust it can bubble up.
Papa had a great idea to use some gravel from our landscaping, so off I went in search of bean-size gravel in my yard. I washed the gravel and placed it inside the pie in an aluminum foil pouch. The recipe said to bake with the pie weights for 10 minutes, then pull the weights out and bake another 10 minutes. After the first 10 minutes I went to take the weights out and the crust immediately started to shrink up, and it was still very soft, not starting to harden at all yet. I shoved the weight pouch back in and baked it for another few minutes until it looked firmer and when I pulled the weights, it didn't shrink in. Then I put it back in the oven alone, and to my horror, a huge bubble formed after a couple minutes. I pulled the crust and poked the bubble with a fork- but was careful just to break the top layer of the bubble because if the holes when all the way through the crust, the filling would ooze out the bottom. I wasn't sure if I had achieved the right level of crispness, but I was done with these blind baking shenanigans and poured in the filling.
I poured the filling into the pie, but due to the shrinkage of my pie crust, there was more filling that I could use. I did not want to waste this glorious custard-to-be, so I grabbed a couple ramekins, filled them up and baked them off. If only I had a torch, I could have had pumpkin brulee.

The filling is a Paula Dean recipe (look on Food Network's website) that is quite different from the traditional pumpkin pie recipe that is on the back of the pumpkin can. I hadn't even realized this until I compared it after Papa noticed that my pie was lighter in color (no molasses) and has cream cheese in it. Really, it's more like a pumpkin cheese cake pie, but whatever you want to call it, it was really yummy. I did add some nutmeg to it, which Paula didn't call for, but I just can't have a Fall pie without nutmeg.


Pie #2 was another apple pie. This time, I harkened back to a recipe from 1953 that my grandmother used for her apple pie crust. It's called a "stir and roll" crust because there is no chilling of the dough, you literally stir the ingredients and roll it out. This recipe came from an Wesson oil advertisement and uses, you guessed it, oil as the fat. Apparently, my grandmother developed a tweak to this recipe to make it roll better and I did not channel her thoughts well enough because I had a terrible time getting this crust to roll. First off, I just don't think there is enough of it for my pie plate. The pie plate I use is a big of a "deep dish" version, and I'm guessing what Wesson oil had in mind was a shorter sided dish. That aside, this dough had nearly no elasticity to it. It didn't feel to dry, but it cracked terribly, it was very fragile. I was getting frustrated, but knew I had a store-bought pie crust in the freezer in case of emergency, so I was able to maintain my cool, but Erik, seeing my near-quitting attitude said "pretend like failure is not an option." And damnit, I rolled out that dough! Except, it didn't quite roll big enough and so it barely met itself all the way around, and forget having enough to crimp together. I figured I could have a mess in my oven with this situation, so I put the pie plate on a sheet pan lined with aluminum foil. I usually put a pan on the bottom rack in the oven because bubble overs are always possible, but never directly on the sheet pan. When I took a bite of this pie I was shocked at hour crispy the bottom crust was. I couldn't put my finger on why until I remembered my change in procedure. You know how sometimes with a two-crust pie the top is all browned and fully cooked, and the filling is done, but the bottom crust is a bit mushy? Well, if that happens to you, try putting the pie plate on a sheet pan in the oven. I love these types of discoveries! I will probably try this crust again and see if I can discover my grandmother's secret, but I have to say, I missed the butter flavor of my Martha crust.

Tuesday, October 27, 2009

Breakfast for dinner!

I think I've mentioned before that breakfast is my favorite meal to cook. I do, of course, love getting out the fine china and making special meals on occasion, but really, I'd make a fancy breakfast every day if I had my way. To extend the opportunity to make more breakfast food, it was breakfast for dinner tonight! There are so many great things about breakfast for dinner, including it being generally cheap and fast. Tonight I decided on bacon, frittata and blueberry pancakes.

Blueberry pancakes in October?! Yes, well, these were frozen blueberries. I had serious reservations about using frozen blueberries in anything other than a smoothie, but these ones I've been buying are really good for frozen berries. They are large, plump, and return to "life" easily in a water bath.

The frittata was particularly scrumptious. I started by sauteing some onions in my non-stick and oven safe (up to 350) skillet. While they were very soft and starting to brown (and get sweet), I beat together 6 eggs, some skim milk, shredded cheddar cheese, chopped grape tomatoes, salt, pepper and Mrs. Dash table seasoning. I poured that into the skillet, which was on medium heat, and left it lone for a couple minutes to start setting. Then I put it into a 325 degree oven until it no longer giggles when you give the pan a little shake. The seasoning is very important. I feel like this application of eggs can be really bland and disappointing if under seasoned. However, I do still want the eggs to shine, and things like sauteed garlic sometimes over power them.

Thursday, October 1, 2009

T-bone


This was the first time I brought a T-bone steak home to cook. This is mostly due to the price of this cut, but it was on sale and looked good, so I went for it. When I think of T-bones, I think of Papa buying one as a treat for my mom on occasion (pretty sure I would get a hot dog that night- but being a kid who loves hot dogs, I'm sure I didn't know what I was missing!). So of course, for my first attempt, I phoned Papa for advice on cooking it. I had three options in my head: 1) Outdoor grill. I threw this out almost immediately because firing up our charcoal grill is a bit of a process and with two kids to watch (it being a weeknight so Erik couldn't do it, or we wouldn't eat til 9pm), this was a tough option to justify. 2) My indoor grill- imitation George Forman type. This seemed like a pretty good option, but I was worried the bone in the steak might not allow the top of the grill to close onto the lower portion of the steak and cook it unevenly. 3) Cast iron pan. The old standard. This type of pan is great for meat because it gets ripping hot and holds onto that heat well once food is put in it. Papa and I decided this was the way to go. It can also be transferred to the oven and with this being a relatively thick T-bone, we figured a nice hot sear on both sides and then finished in the oven to desired doneness would work well. And it did. I had seasoned it with salt and garlic powder. I didn't want to put fresh cracked pepper on it because I didn't want it to burn in the hot pan. I let it go just a shade too long and it was more on the medium well than medium rare side of things, but with such a quality cut of meat, it was still wonderful and the fillet side could be cut with a butter knife.

Monday, September 28, 2009

Ocean Perch


Continuing in my search for new fish options, I saw fresh ocean perch on sale at the store the other day. My only experience with perch until this point was lake perch, which unless you caught a really big one, we always threw back. Too small and boney to deal with. The ocean perch looked and smelled good though, so I came home with some and did a little research online for recipes. I saw a lot of baked ideas, but didn't feel like turning the oven on just for a piece of fish, so I took the breading idea from the baked recipes and just did it in a pan with some olive oil instead. I dredged the filet in bread crumbs with parmesan cheese, dried herbs and salt. A great feature of fish for a weeknight meal is how fast it cooks! To go with it, another fast side: spinach with garlic. I just slice the garlic because the bigger pieces are sweeter than minced when you let them slowly caramelize in the pan in some olive oil. Then just add fresh spinach (baby is best, but regular large leaf is fine, just pull out the big stem pieces) and some salt to taste and wilt the leaves in the hot oil. This was a fast, yummy and healthy meal. One thing that was still true about my knowledge of perch though: boney. We found bones in both pieces I cooked, so be careful! Those tiny bones were like needles.

Monday, September 21, 2009

Ode to Orzo


Since I made the orzo salad with spinach, feta and tomatoes, I have been using orzo in other applications because Erik expressed a liking for it and I think it's fun. It's like the marriage of rice and pasta and opens up applications you could use either of those starches in.
For this dinner I added a can of cream of mushroom soup, a little milk (just to thin out the condensed soup a bit, not as much as is called for for soup- we're not making soup here, after all) and fresh spinach to the orzo along with some Parmesan cheese and salt and pepper. You could certainly add some chicken to boost it up a notch too, but I thought it was pretty hearty on its own and I'm always happy to find some other dishes I can make for vegetarian friends and family.

Sunday, September 20, 2009

First Apple Pie


Ever since I was old enough to make pie, I have endeavored to create one just like my paternal grandmother's. That pie was the best part of Thanksgiving dinner for many of my young years. My memory of it may be more about the warmth and joy of the family on that particular day of the year rather than the actual pie recipe, but I am sure it was also a darn good pie.

Apple pie is a favorite in our house. Erik would eat them year round if I made them, but I prefer to wait for the local apple crop to come in. The weather was gorgeous yesterday and we went out to a local farm and bought a bag of Macintosh apples. Normally, I do not use a single type of apple for my pies, but rather use one or two apples of three to four varieties. This way it "hedges my bet" that there is one or two that will be too mealy or mushy and evens out the tart/sweetness. With these apples being so fresh, I figured I'd just go for it and use only them. I like my pie a bit on the "spicy" side, so I put in a good teaspoon of cinnamon, a hefty pinch of all spice, a pinch of ground cloves and a pinch of freshly grated nutmeg. I usually use brown sugar and vary the amount depending on the types of apples anywhere from 1/2 to almost a full cup. I put maybe a tablespoon of flour or so in with the apples to help thicken the filling and usually a couple "dots" of butter over the filling once it's in the pie plate. I also add some cinnamon sugar on top of the crust which browns up nicely and adds some more flavor to the crust. I did not make my own crust this time, it was store bought. I usually save crust making for a really special occasion- for my sanity mostly. I am still working on being reliable with my own crust.

Pie is fun and frustrating to make because I could do everything (other than the apples) exactly the same every time and have a very different pie outcome. Sadly, with this bunch of apples, the pie ended up too tart and mushy, although it looked gorgeous! The mushiness I think was a product of cooking a bit too long (although the crust was nearly perfectly done, I'd say, so I wouldn't have wanted to cook it too much less). The tartness was my underestimation of how strong this bunch of macs was. When I add in some galas, fuji or other sweeter variety, the amount of sugar I put it would have certainly been enough, and probably would have helped the texture too.
Nevertheless, the first pie of the season is cause for celebration. I'm certain my grandma knew the trials and tribulations of a finicky pie and is smirking along with me at this one.

Friday, September 18, 2009

Tilapia


The prices of fish at the market have been hard to swallow sometimes, but I know fish is good for us and so I branched out recently into a new kind that I had never cooked before- tilapia. I went online to find research recipes and learned it was a whitefish much like cod, so that helped. I decided to go it on my own after reading up a bit, and I seasoned it with salt and Old Bay, then dusted it with flour and cooked it in a frying pan with some olive oil. When it was golden on both sides, I took it out and then put some butter in the same pan, some fresh squeezed lemon juice, and a bunch of fresh sage leaves (because I happen to have plenty ready to pick in my herb garden) hand torn, and a little salt and pepper. Cooked that sauce for a minute and poured it over the fish. Voila! I even got a little fancy with a lemon wedge garnish... oohh la la! Tilapia filets are not large so they are perfect portion sizes AND cook quickly. I think I'll be back for more next time I see them at the market.

Sunday, September 13, 2009

Adventures in Piping


I got a set of decorating tips and a piping bag for Christmas and thought it was finally time to give it a try. I have envisioned making gorgeous layered cakes with beautiful designs on them for a long time, but have always been thwarted by apprehension. Then I was inspired by an episode of Barefoot Contessa where Ina was celebrating her anniversary with her husband and just "whipped up" a three tiered cake with a simple, but elegant piping job on it. "I can do that!" I thought. Yes, I know, she is a professional and used to make all occasion cakes at her shop, but she made it look so easy, I was inspired.
I had an occasion to make a cake this weekend and I decided to go for it. The cake is a carrot cake recipe I got out of a "healthy" cookbook and it involves whipping egg whites until they are at "soft peak" stage and then folding in the ingredients one by one so as not to completely deflate the foam. It is a very "springy" cake in texture, pretty dense, and very flavorful. I love it and carrot cake is Erik's favorite. For the frosting, I have a relative who does not like confectioner's sugar, so I wanted to make the frosting without using it. I tried to find recipes on the internet without confectioner's sugar. Yikes. My new plan was to try Superfine sugar. I was worried even Superfine would be a bit grainy in the final product so I added just enough hot water to it to melt it before adding it to the cream cheese and butter I was beating up in the Kitchen Aid. This worked like a charm with the grainy issue, but sadly, left my frosting too soft. I tried switching out my paddle attachment for my whip attachment and that added some body to it. Then I put it in the fridge for a while to see what that would do, and that helped but not enough to hold the shape of the star tip piping. It could have maybe been chilled longer, but I think next time I will try the Superfine without mixing with water and see what that does.
Despite the "goopiness" of this frosting, I was not deterred from trying to decorate my cake. I think for a first attempt it's not too terrible. I need to work on the evenness of my strokes, and with this soft frosting I went too close to the edge on the top a couple times and it nearly fell right off.
Definitely a fun thing to try and I think there will be more elaborately decorated cakes in my future. Watch out, Ace of Cakes, I may be looking for a job soon ;)

Friday, September 4, 2009

Eggplant Fritters


Every so often I buy eggplant because for some reason I feel as though I should cook with it and like it. I don't know where this urge came from, but there it is. I feel like eggplant parmesan is a hassle and usually ends up greasy. Eggplant's ability to absorb grease and water can make it difficult to deal with and I also find it goes from not cooked, to mushy in about 20 seconds difference of cook time, so you have to watch it!
For this round of eggplant cookery, I found a recipe for eggplant fritters in the Joy of Cooking cookbook (right above the calf brain fritters). It involves precooking the eggplant in some water with a teaspoon of vinegar then creating a batter with some flour, baking powder, an egg and salt. Once the batter is made you have to let it rest for two hours, then fry it up! I have tried a similar batter in my deep fryer before and it slid through the basket before setting up and made a big mess, so this time I went with a sauce pan and enough oil to go 2/3 of the way up the fritters, requiring a flip halfway through cooking. I had a little trouble with them sticking to the bottom of my pan, but learned I just had to be firm with my spatula and all was well.
I made some tartar sauce to dip in, not knowing what might be traditional for this application, but really what savory fried food doesn't go well with tartar sauce? This may be one of my favorite eggplant concoctions thus far, but I've been told to try it on pizza... perhaps next time I get the urge in the produce aisle for this purple delight.

Monday, August 31, 2009

When life gives you 90 degree heat and humidity...


make lemonade! Or in this case, lemon-limeade, because I had some limes that were on their way out. I like mine really strong- the kind where you are left sucking your cheeks together after a gulp, so there are lots of lemons and limes in this one pitcher. Then it's just a matter of how much sweet you want to add in the form of simple syrup (equal parts sugar and hot water to dissolve the sugar).
You know those silly hypothetical questions like "if you could bring one _____ to a desert island, what would it be?" Well, lemonade might be the drink I'd bring. I swear, if I didn't think I would eventually burn a hole in my esophagus (and gain weight on the sugar) I would drink it all the time. Although, it is easier to savor as a special treat. This batch, really hit the spot!

Saturday, August 1, 2009

Golden Graham French Toast


Sorry for the hiatus, blog readers, but as most of you know, I was busy having my second baby recently and due to my friends' and family's generous gifts of dinner brought to my door since the baby has been born, I haven't been doing much cooking! The one exception has been breakfast. I LOVE cooking breakfast and it is the meal that I only really get to make on weekends when the whole family is home to eat a leisurely morning meal. With Erik home on paternity leave, though, I've had ample breakfast cooking adventures and have enjoyed every attempt at it. I had to share this amazing version of french toast. I got the idea from Diners Drive-ins and Dives on Food Network where someone made Captain Crunch Cereal encrusted french toast. I was in awe of the genius idea. I try not to buy too much sugary cereal though because I love it so much I'd probably eat it two meals a day and that's just not healthy, however we did have some Golden Grahams in the house and I thought that would be a great variation.
The wet mixture had eggs, half and half, cinnamon and vanilla extract in it. Then I just pounded the cereal in a plastic bag with a meat mallet. I wanted there to be some bigger pieces, not just all powder crumbs, or I would have used the mini cuisinart. After a good soak in the wet mixture, I coated in the cereal and put on the griddle. I thought I had over done the crust a bit as it was nearly getting to be burnt, but Erik liked that deep flavor better than my less well done pieces. You do have to be careful that the temperature isn't too hot on the griddle because you can easily burn the cereal before the egg mixture has set. I loved the crunch and flavor the cereal brought to the toast- with a little maple syrup, it was perfect! I can't wait to try other cereals!
Thursday, June 25, 2009

Local Flavors


Despite the abysmal weather we have been experiencing, there are some local products starting to hit the market and making me quite happy. Keagan and I went to a local farm for strawberries, honey and ice cream. I wish this blog was equipped to let you smell these berries because they are spectacular. The honey is from local bees, and is supposed to help people with seasonal allergies if you eat it (has to be _raw_ and local though). So we're testing out that theory, at least for Erik. I'm not a big allergy sufferer, I just like honey. Simple as it sounds, fresh strawberries and honey on toast makes for a delightful meal. The Maynard Farmer's Market is opening this weekend and I am looking forward to what else the farmers have been able to make grow in this dreary weather. Surprisingly, we've had our own luck getting a pumpkin seed to grow outside and are hoping we may get a home-grown Halloween pumpkin this year.
Saturday, June 20, 2009

Shepherd's Pie


It has been a very cool, gloomy June and I've found myself cooking very "out of season" with things like roast beef. Why not have the oven on if it's 60 degrees and raining?? With the leftover roast beef and mashed potatoes, I decided to make a shepherd's pie... of sorts... it was a bit more soupy that I had wanted, but it was hearty, tasty and brought a bit of warmth to a cool, raw evening. It is a cinch to make if you have leftover meat and mashed potatoes, too. I also had leftover gravy, so the filling was simply chopped up meat, gravy, and veggies, then a big layer of mashed potatoes on top. This is one of those old-world dishes that has many incarnations, but for ease and tastiness for this evening, mine worked out just fine.

Monday, June 8, 2009

Summer Salads


Sometimes the same old macaroni and potato salads can get a little boring for summer cookouts (well, at least for some people, I might not be one of them). I have found two alternatives that are as tasty as they are beautiful in the bowl.
The first is a black bean and corn salad from a Rachel Ray recipe. You can probably still find the recipe at foodnetwork.com (I'm not going to chance copyright infringement here). It is incredibly simple to make and doesn't involve any cooking (perfect for a hot summer day). What makes this salad so tasty is the balance of sweet with the corn, salty with the beans, peppery punch of the red onion and freshness of the red pepper. Plus, the use of cumin and lime juice in the dressing adds a little something unexpected. It's also a great offering for vegetarians in your cookout crowd, who are sometimes left with carrot sticks and dip to eat ;) My only suggestion for this salad would be to add a touch of aroma and green color with some fresh flat-leaf parsley, or possibly cilantro (which I'm not a huge fan of, but could see it in here if you like it).
The second salad is a Greek Orzo and Spinach salad that I got a recipe for from a friend. I did my own bit of tweaking to it before it was done, but was very pleased with the results. I think what makes a big difference in this salad is the choice of produce. I used fresh baby spinach and let the heat of the cooked orzo wilt it just slightly with some olive oil to prevent sticking, then put it in the fridge to chill before adding the other ingredients. The rest of the additions are cucumbers, tomatoes, scallions, feta cheese, and a dressing of olive oil, red wine vinegar and lemon juice, with some salt and pepper. I used Armenian cucumbers, which are small, very sweet cukes that you don't have to peel or seed. Grape tomatoes were the suggestion of the recipe, and I agree are a great choice. For the feta cheese, I found a mild cow's milk feta and bought it in a block so that I could leave it as little cubes in the salad. This way, if feta isn't your favorite, you can pick it out, but I was happy to see that with the milder version, the feta was a success. This was a fun salad to build. I didn't worry about the recipe's amounts for anything, I just went with how things seem to balance, added some more lemon juice when I thought it needed a bit more fresh bite and aroma, then some more salt when it had rest for a while and seemed a timy bit bland. The ratio of orzo to veggies is also up for fiddling with. Once you have the idea down, it's a great one to play with.

Friday, May 29, 2009

Whipped Cream


Sometimes it's the simplest of things that make the most magic in the kitchen (and on the dining table). Whipped cream is one of those to me. Granted, if you do not have a stand mixer (Kitchen Aid type) then this isn't exactly the easiest of things to make. You can do it with a hand mixer with the whip attachments, or even by hand with a balloon whisk... but I do not envy you that task. Having a Kitchen Aid myself, I make my own whipped cream frequently. That's not to say I never use the canned stuff. Honestly, if all you want is a dollop on some cocoa, that's the best way to go because the homemade kind has two problems with it. 1) It's hard to make a small batch- at least in the Kitchen Aid, because only a tiny portion of the whip attachment touches the cream if there is just a bit in the bottom of the big bowl and therefore it can take a long time to whip up, or just not work at all. So I always go with 1/2 a pint or more of cream to start. 2) Homemade does not last more than maybe a day before melting back and separating. So it's not like you can always have some handy in the fridge. There is no substitute for the homemade version though if you have an occasion to do it. Here's how I do mine:
I often use "Whipping Cream", which is cream with some emulsifiers and stabilizers added to help the process. If that weirds you out at all, go ahead and use regular Heavy Cream. The process will also be greatly shortened if you put your mixing bowl and whip attachment into the freezer for a few minutes before starting. Also make sure the cream is very cold- don't take it out of the fridge a minute before you're going to add it to your bowl. Starting with everything cold will make the cream whip up much faster- if doing this by hand do not skip this step.
Then it is simply a matter of putting the Kitchen Aid (or your arm!) on high speed and watching the magic happen. The cream will start to get very glossy and you will be able to see the whisk leave behind it's mark when things get going. Then, once the cream goes from glossy to a matte finish and starts standing up and pulling away from the sides of the bowl, stop the mixing. Remember- too far, and you have butter, not whipped cream.
The possibilities for your creation are nearly endless- as are what you can add to it. Of course a little sugar is generally a rule, but don't go overboard, cream itself is just too good to cover up entirely with sweetness. Any number of flavor additions are fabulous depending on where the cream is ending up, but vanilla extract, Gran Marnier, Kahlua or other liquors can really add something special. Again, just don't go overboard, and wait until the cream is just starting to thicken so you don't slow the process of whipping down too much from the beginning.
This time around, I went very simple. A little sugar, a little vanilla to top a glass of fresh berries. Sometimes it's the simplest things that are the most elegant and satisfying.

Sunday, May 24, 2009

Putting the salad back in Potato Salad


It's Memorial Day weekend, and of course, that means grill and warm weather food! I was inspired to make potato salad with some family coming over and pondered my method for this dish.
Potato salad is one of my absolute favorite warm weather dishes, but I am rather picky about it. My big thing concerning potato salad is I want it to have a bunch of veggies in it- or rather, have some salad in my potato salad! I am not a fan of an all-white bowl of potatoes with mayo. I first started on this kick when getting a recipe for a healthier version of potato salad by Juan Carlos Cruz, who had a brief show on Food Network about re-working people's favorite "bad" foods. His version has no mayo at all, and instead employed buttermilk and sour cream. I was intrigued. What I also took away from his recipe was the beefing up the veggie content. Although I find it amusing to have a specific recipe for exactly what kinds of veggies and their amounts for something like potato salad. "Use one 1/3 of a large carrot" or "one and one half stalks of celery"... what if I want a half of a carrot? I'm being slightly silly here, but you get my idea.
For my potato salad, I started with red bliss potatoes. I like the color of the skins (and the fact you don't have to peel them), plus their texture can stand up to the task. Yukon golds can make a very good potato salad, too. The trick to the potatoes is to cut them and immediately put them into a pot of cold water. This prevents browning. You don't want them sitting around on your counter sliced. Once they are all cut, check out the amount of water in your pot. It should be covering the potatoes completely, but not much after that. It's not like pasta where you need a lot of water for the amount of pasta you put in. You also want to salt the water and bring it up to just above a simmer, but not a really heavy rolling boil. If you get it heavily boiling your potatoes will suck in too much water and become water logged with a grainy texture and will fall apart in your salad. Do not over cook them for that reason as well, you want them to hold their shape in your bowl. You know they are done by inserting a sharp knife (non-serrated) into a piece of potato and then trying to lift the potato out of the water- if it falls off readily, they are done. If the potato breaks in half at the piercing, you over did it a little. If the potato gets all the way out of the water and is not falling off- they need a bit longer.
While the taters are cooking, I created my dressing for the salad. I used mayonnaise, sour cream and buttermilk in a ratio of about 3:2:1- maybe not quite that heavy on the mayo. Then I added a couple tablespoons of dijon mustard and about a tablespoon of sweet relish. I really like the tanginess that the dijon, relish, buttermilk and sour cream add, while keeping with the creamy, richness of mayo. For more flavor, some salt and pepper and a good bit of fresh dill. I have recently found some dried dill that is still nice and green in the jar and almost as good as the fresh version, so if you have that instead, go for it. There are certainly other herbs that could be employed, but for me, dill makes potato salad. Hard cooked eggs are traditional as well, but this time around I left them out. Honestly, I didn't miss them, but that doesn't mean I don't think they belong here.
When prepping my veggie add-ins, it really depends on what I have on hand and what looks good. I happen to get some gorgeous tri-colored radishes from a farm in Hadley, MA that my local produce store had this week. I love the color and crunch they added. Then some usual suspects : carrots, cucumber, and tomato. For the cucumber I used Romanian cucumbers that are very small and sweet but require no peeling or seeding. I used grape tomatoes, cut in half, but didn't add them until most of the combining and mixing was done, so as not to smash them. I like to have some onion flavor, but wasn't sure how others felt about biting into pieces of raw onion, so I used a good bunch of scallions instead.
Let the potatoes cool a bit in the colander before adding them to your dressing- to avoid any unpleasantries with warmed mayonnaise. Be sure to put the whole thing directly into the fridge to cool it down before serving and try not to leave it out of the fridge too long during a dinner party (room temperature and dairy + egg products just aren't safe for too long). I usually leave my final tasting until after it's chilled as well because you'll find some of the flavors mellow out in that time, while others develop, so you may need to add a bit more salt or other ingredient to get it just right. Be careful not to over salt at the first tasting before this resting period. If you are serving for a party and want to make it look extra special, some slices of hard boiled egg, alternated with slices of cucumber and/or tomato on top is very pretty.

Thursday, May 21, 2009

Chicken and Broccoli "Alfredo"


I have an abundance of chicken breasts in the freezer at the moment and was starting to run out of my usual go-to meals. Then I thought of chicken and broccoli alfredo. This is a dish I occasionally order out at restaurants (when was it exactly that this became a staple on virtually all middle of the road American restaurants?), but realized I had never actually made it at home. I thought to myself "why not?", it's not like it's really that complicated. Perhaps it was the term "alfredo" that scared me. Not sure why. A classic alfredo from Rome is nothing more than butter and parmesan cheese melted together and used to coat pasta. Of course in American restaurants things like garlic, cream, chicken or shrimp and vegetables are pretty much standard additions.
For my "alfredo" sauce, I started with some butter and olive oil in a large pan. Then I added a bit of flour, making a roux to thicken some skim milk and half and half. When I had that at a good consistency (not super thick, knowing what came next), I added some parmesan cheese. To flavor it up a bit I added a little salt and pepper, and a pinch of freshly grated nutmeg. I love nutmeg (only freshly grated with this spice will do for me) and knowing how well it goes in something like a creamy gratin, I figured I'd add it.
The chicken I cooked on my little indoor grill with some garlic and herb spice on it. I like the texture the grilling added- giving the chicken a slightly charred outer coating, plus the flavor of the herb mix. I think it was a little more exciting that just cooking the chicken in the pan before building the sauce. I left the breasts whole for grilling and chopped them into bite sized pieces once cool enough to handle, then added them to the sauce.
The broccoli came from a bag of frozen broccoli florets that I put in the microwave with some plastic wrap on top of a big glass bowl (to help hold the steam in and cook them faster). I left them a bit under done, and let them finish up in the hot sauce.
Traditionally, you might see fettucini with alfredo sauce, or often a penne when you get it in an American restaurant with broccoli and chicken, but I happen to have some farfalle in my pantry and thought it would look pretty, plus still hold the sauce well. I don't often use farfalle because sometimes I find it hard to get the pinched inside of the bow to be cooked without the outer edges of it falling apart. It's just the nature of the shape I think, but they sure do look nice when it works out.

Tuesday, May 19, 2009

Adventures in Pineapple

I had a can of pineapple chunks in my pantry for a while, that just decided to "speak" to me this week.


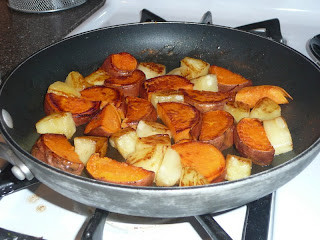
My first use of half the can was with some sweet potato. I thought of these two together from a sweet potato and pineapple casserole that I made once as a vegetarian side dish option for a holiday party. Wanting that same flavor profile, without the use of the oven was my basic idea. I thought the use of a bit of butter and some caramelization in a pan would make for a very nice side dish for dinner. I partially cooked the sweet potato in the microwave- leaving it whole and just poking it a couple times to let the steam out. It was important not to cook it too much, or it would not slice into the pieces I wanted for the dish. After melting some butter in a frying pan, I added the pieces of potato and pineapple chunks, with a bit of their juice. Once one side was nice and browned, I flipped each piece over to get the same effect on the other side.
The result looked very nice, but I felt there was something a little lacking. The pineapple had gotten quite concentrated in flavor with the process and was almost too sour. When eating with the sweet, creaminess of a piece of potato in the same bite, it worked well. Perhaps if it had a little bit of sauce or the pieces were smaller and therefore you would most likely eat small pieces of both in each bite. It's a little bit of a work in progress. Fresh pineapple, as opposed to canned, may also change things.


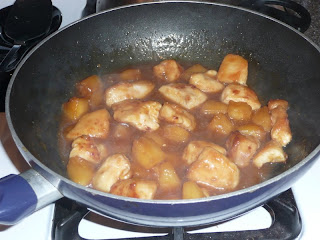
My second adventure with the other half of the pineapple can involved an asian-influenced chicken with pineapple dish. This time I started with some large bite-sized pieces of chicken and dredged them in some flour before cooking them in butter and olive oil. I wanted just a little bit of a crispy, brown coating to them. When they were cooked through, I removed them from the pan and created a pineapple sauce. I dumped the rest of the pineapple chunks and their juice in the pan, plus the juice and pulp from one orange, and a bit of teriyaki marinade I had in the fridge. I let it reduce a bit and thicken slightly, but wanted more than just a juicy sauce- I wanted it to really coat the chicken, so I added a little bit of a cornstarch slurry (cornstarch and water) while it was simmering to tighten it up. When it was at the consistency I wanted, I added the chicken into the pan and coated it with the sauce. Served with rice, it was very tasty. Erik said it may have been one of my best chicken concoctions to date (but he's a big fan of this type of thing).

Friday, May 8, 2009

Tonight's Version of Chili is...


I must thank my friend Liza for opening my eyes to chili when we lived together in college. Chili wasn't something that was made much in my home growing up and I was not what you'd call an "adventurous" eater as a child or young adult (but I'm getting there!). Since Liza's tutelage, chili has been a staple in my cooking repertoire and I've come to love it.
I decided to do a bit of research on what "chili" actually is and found a good summary on wikipedia. "Chili con carne (literally "Chili with meat", often known simply as chili) is a spicy stew made from chili peppers, meat, garlic, onions, and cumin. Traditional chili is made with chopped or ground beef. Variations, either geographic or by personal preference, may substitute different types of meat and may also include tomatoes, beans, or other ingredients." There was a lot more on the different regional adaptations of chili in the article, including a great quote "If you know beans about chili, you know chili ain't got no beans." I realize this is a bone of contention between chili-lovers, but I think the phrase "to each his own" when I think about chili. It's a great one-pot meal that can be a bit of a "catch-all" for what you have in the pantry or fridge that night. I think of chili as a concept of a dish, rather than a specific regimen. But then again, I don't live in Texas.
With this philosophy for making chili, my concoctions are never the same twice. Originally, when I relied heavily on McCormick's Chili seasoning packet, many of my pots were similar. These days, I've thrown away reliance on the packet and head to my spice shelves looking for inspiration. I couldn't tell you all the additions and measurements of what went into this particular pot, but I know it included chili powder, smoked paprika, Old Bay, cinnamon and some Ms. Dash blend (ok, maybe I still buy some seasoning mixes). I was horrified to find my cumin empty- apparently my mental note about using that up didn't compute. But that just makes it more fun and why I went with the Old Bay for something different. I also had chives and oregano sprouting in my herb pots, so threw some of those in as well. Of course salt and pepper are in the mix, as well as just a bit of sugar to help with the acidity of the canned tomatoes- which brings me to what else is in there.
Ground turkey was on sale this week, so that is my meat instead of ground beef. I know, I know, another cardinal sin from Texas, but it is healthier and was cheaper than beef. The rest of what's in there may be considered "fillers" by some, and will definitely get you disqualified from a chili cook-off, but I think of them not as filler but textural, nutritional and down right tasty enhancements. I chopped some onions and red bell pepper to start with, and added some halved grape tomatoes (because I had them and they needed to be eaten) and some canned stewed tomatoes. Then I used dark red kidney beans and small red beans and also threw in some frozen corn because I like the bit of sweetness and color it adds to the party. There needed to be more sauciness so I added an 8 ounce can of tomato sauce. Often I will also add about half a beer for the sauce (another Liza hand-me-down), but didn't have any in the fridge. (See, it's not about planning it's just about spontaneous chili cooking!)
I like to let things simmer together for at least an hour to marry all the flavors and get a good, rich feel. To finish things off, I'm a fan of some sour cream, cheese and usually scallions, but I didn't have them, so it was more chives from my herb pot.
Maybe this won't win any Texas chili competitions (because it couldn't even be entered) but I still think it makes a dang good dinner, ya'll.

Thursday, May 7, 2009

Torturous French Toast


This French Toast was torturous for Erik, not me, who ate it :) Here's the story:

We had some baguette-type rolls in the house for a night of sausage, peppers and onions for dinner and there was an odd amount of rolls in the package, leaving one left after the dinner meal. A couple days later, the roll was a bit stale. I decided it would make yummy French Toast and started slicing it appropriately. That morning, Erik had to take all our leaf bags out to the curb along with the garbage and he came in complaining he was hungry (he normally eats at work and has a stash of breakfast stuff there). So I handed him one of the little round ends of the bread, which wouldn't sit well in a pan for French Toast. He ate that one, then went over to my bread to grab another of the nice slices to which I protested "No! That's for my French Toast!" but gave him the other rounded end piece. His response was a shocked and terribly disappointed look and he said "now I'll be tortured thinking about all the things I miss when I'm gone." Poor Hubby. Not to worry, he'll get his French Toast this weekend.

This batch of French Toast was, in fact, amazing. I put half and half, cinnamon and vanilla extract into the egg mixture and let the slices soak for several minutes on each side until they were quite gooey in the centers, but the crust was still holding together. I cooked them in a pan with some butter, but also covered them for a little while since they were thick, just to make sure they were totally done. They came out soft on the inside and crispy on the outside. Such a weekday treat!

Monday, May 4, 2009

"A Good Head of Cauliflower"


This post is dedicated to Lena who recently said "there's no such thing as a good head of cauliflower" when I was poking fun that she only likes green vegetables. Lena, this one's for you!

I had a head of cauliflower in the fridge that needed to be eaten before it started turning brown, and I decided to get away from the obvious choice of steaming it and thn drowning it in cheese sauce. Tasty for sure, but a bit boring and calorie heavy. I decided instead to saute it with garlic, olive oil and a bit of butter. The garlic was not chopped, but just broken into a couple large piece per clove- from smacking it with the side of my knife to get the peel off. I used about 3-4 cloves. I also seasoned with salt and pepper. The cauliflower was beautifully browned and carmelized and infused with all the flavor of the garlic, oil and butter. The garlic pieces were soft and sweet. It was a fantastic side dish. Even Erik (who isn't a huge fan of the vegetable) ate it all off his plate. I have to quote him too "you could make poop taste good"... "I hoped you don't take that the wrong way and think I'm comparing your food to poop." Thanks, sweetie.
I also looked up cauliflower's nutritional value and found this:
This food is very low in Saturated Fat and Cholesterol. It is also a good source of Protein, Thiamin, Riboflavin, Niacin, Magnesium and Phosphorus, and a very good source of Dietary Fiber, Vitamin C, Vitamin K, Vitamin B6, Folate, Pantothenic Acid, Potassium and Manganese.

Who knew it had protein in it?

Thursday, April 30, 2009

Conquering Homemade Pizza


I feel triumphant in my kitchen this evening. I have conquered a major nemesis: homemade pizza.
Loyal blog viewers will remember my first post was about trying to make a pizza at home with very mixed results, although at least better than some of my previous trials in which the pizza never made it to our plates. This time, I faced my fear of the pizza stone and I'm never looking back! Here's how I did it.

First, I set my oven to 475 and waited for it to actually beep at me when it came up to temperature (sometimes with other things I have cheated when impatient.)
I used Trader Joe's Garlic and Herb dough for the crust. (Ok, so this part wasn't homemade. Maybe that will be my next adventure.) I should have read the package that says to leave it out of the fridge for 20 minutes before handling... whoops... but since I made two smaller pizzas with it (a method to help me control getting the pizza off and on the stone), by the second one, the dough was much easier to work with. I'll know better next time.
I assembled the pizza on the pizza peel, which was dusted with corn meal before placing the crust on it. This helps the dough slide off the peel, and also adds just a bit of texture to the finished crust bottom as well. I checked my ability to slide the crust around on the peel a bit before adding the toppings.
For the sauce, I used an 8 ounce can of plain tomato sauce and added a good pinch of sugar and kosher salt, plus dried basil and oregano. For toppings I used some onion and chicken sausage.
The result was fantastic. It had a very crispy crust on the bottom, but still chewy around the edges and was not at all greasy. Our local pizza joint may have just lost some business.

Tuesday, April 28, 2009

Grill Eats


We've had a streak of warm weather this week, which has lead to an increase in our outdoor cooking for the season. We have a charcoal grill, which Erik swears by and has no interest and moving to propane. I agree with him 90% of the time. I love the charcoal smell, and the decrease in flame-ups you get cooking over charcoal. Occasionally, though, there are those times when I'd like to take 5 minutes to heat up a grill, rather than 25 minutes (we use a chimney starter and natural briquettes, no lighter fluid near what I will ingest, thank you), but early in the season like this, it is a pleasure.
One of our all-time favorite meat choices for the grill is beef sirloin tips. Usually, I marinate them in some teriyaki sauce for a couple hours prior to grilling. They are always flavorful and tender, but still with a bit of chewy texture in your mouth. Whenever they are on sale and the weather is good, I gotta grab 'em!
For vegetables on the grill, our recent favorite is summer squash and zucchini. I discovered this method and combination last year and love the simple, fresh taste and texture of it. I was inspired one evening by a silly Reynold's Wrap commercial about putting veggies in a foil pouch for grilling instead of cooking veggies indoors while your partner is outside on the grill. It was a goofy commercial, but had a good point! It's so nice on a hot day not to have to do any indoor cooking. This method can of course be used by many kinds of veggies and potatoes.
For my summer squash and zucchini, I cut them into about 1 inch pieces- you don't want them too thin so they can retain their shape and keep just a tad of bite to them (not crunchy, but not mushy). I place them on a piece of foil, then drizzle with olive oil, dot some pads of butter around, add salt, pepper and whatever fresh herbs I have on had that will work- this time it was Thyme and Parsley- and then make a packet with another piece of foil crinkled around the edges. We had these on the grill for about 25 minutes- off the direct heat, but with the cover of the grill on. This timing will obviously vary depending on how big your pieces of veggie are and how hot your grill is.
This was a fabulous meal and I look forward to having it several more times this grilling season!

Saturday, April 25, 2009

Blueberry Waffles


The age-old question on Sunday morning: Pancakes or Waffles? Tough call. This is of course, assuming you went with a savory eggs/bacon/hash browns type of breakfast on Saturday ;)
This time I went with waffles. But I wasn't going to be satisfied with just some waffle and syrup on my plate, and I knew that I happened to have an opened bag of blueberries in my freezer. What else could be concluded then to make a blueberry sauce topping! I gave Erik the taste of preparing the waffles (he knows our waffle maker timing better than I do, actually) while I started on the sauce.
The blueberries had, admittedly, been opened for some time in the freezer and therefore had a good amount of ice crystals around them. With this starting condition I decided not to add any water to the pan when I started, figuring there would be enough moisture already. I put the blueberries in a small sauce pan, added some brown sugar and honey and let it come up to a simmer. After a few minutes of simmering, the berries were nice and soft, with the right amount of sweetness, but the sauce was too liquidy for my taste. I made a small amount of cornstarch and water slurry and added that to the simmering mixture. This tightened it right up and had the viscosity I was looking for. It was gorgeous on the waffle, and I also decided it needed a bit of whipped cream to finish it off.