Friday, May 29, 2009
Whipped Cream
Sometimes it's the simplest of things that make the most magic in the kitchen (and on the dining table). Whipped cream is one of those to me. Granted, if you do not have a stand mixer (Kitchen Aid type) then this isn't exactly the easiest of things to make. You can do it with a hand mixer with the whip attachments, or even by hand with a balloon whisk... but I do not envy you that task. Having a Kitchen Aid myself, I make my own whipped cream frequently. That's not to say I never use the canned stuff. Honestly, if all you want is a dollop on some cocoa, that's the best way to go because the homemade kind has two problems with it. 1) It's hard to make a small batch- at least in the Kitchen Aid, because only a tiny portion of the whip attachment touches the cream if there is just a bit in the bottom of the big bowl and therefore it can take a long time to whip up, or just not work at all. So I always go with 1/2 a pint or more of cream to start. 2) Homemade does not last more than maybe a day before melting back and separating. So it's not like you can always have some handy in the fridge. There is no substitute for the homemade version though if you have an occasion to do it. Here's how I do mine:
I often use "Whipping Cream", which is cream with some emulsifiers and stabilizers added to help the process. If that weirds you out at all, go ahead and use regular Heavy Cream. The process will also be greatly shortened if you put your mixing bowl and whip attachment into the freezer for a few minutes before starting. Also make sure the cream is very cold- don't take it out of the fridge a minute before you're going to add it to your bowl. Starting with everything cold will make the cream whip up much faster- if doing this by hand do not skip this step.
Then it is simply a matter of putting the Kitchen Aid (or your arm!) on high speed and watching the magic happen. The cream will start to get very glossy and you will be able to see the whisk leave behind it's mark when things get going. Then, once the cream goes from glossy to a matte finish and starts standing up and pulling away from the sides of the bowl, stop the mixing. Remember- too far, and you have butter, not whipped cream.
The possibilities for your creation are nearly endless- as are what you can add to it. Of course a little sugar is generally a rule, but don't go overboard, cream itself is just too good to cover up entirely with sweetness. Any number of flavor additions are fabulous depending on where the cream is ending up, but vanilla extract, Gran Marnier, Kahlua or other liquors can really add something special. Again, just don't go overboard, and wait until the cream is just starting to thicken so you don't slow the process of whipping down too much from the beginning.
This time around, I went very simple. A little sugar, a little vanilla to top a glass of fresh berries. Sometimes it's the simplest things that are the most elegant and satisfying.
Sunday, May 24, 2009
Putting the salad back in Potato Salad
It's Memorial Day weekend, and of course, that means grill and warm weather food! I was inspired to make potato salad with some family coming over and pondered my method for this dish.
Potato salad is one of my absolute favorite warm weather dishes, but I am rather picky about it. My big thing concerning potato salad is I want it to have a bunch of veggies in it- or rather, have some salad in my potato salad! I am not a fan of an all-white bowl of potatoes with mayo. I first started on this kick when getting a recipe for a healthier version of potato salad by Juan Carlos Cruz, who had a brief show on Food Network about re-working people's favorite "bad" foods. His version has no mayo at all, and instead employed buttermilk and sour cream. I was intrigued. What I also took away from his recipe was the beefing up the veggie content. Although I find it amusing to have a specific recipe for exactly what kinds of veggies and their amounts for something like potato salad. "Use one 1/3 of a large carrot" or "one and one half stalks of celery"... what if I want a half of a carrot? I'm being slightly silly here, but you get my idea.
For my potato salad, I started with red bliss potatoes. I like the color of the skins (and the fact you don't have to peel them), plus their texture can stand up to the task. Yukon golds can make a very good potato salad, too. The trick to the potatoes is to cut them and immediately put them into a pot of cold water. This prevents browning. You don't want them sitting around on your counter sliced. Once they are all cut, check out the amount of water in your pot. It should be covering the potatoes completely, but not much after that. It's not like pasta where you need a lot of water for the amount of pasta you put in. You also want to salt the water and bring it up to just above a simmer, but not a really heavy rolling boil. If you get it heavily boiling your potatoes will suck in too much water and become water logged with a grainy texture and will fall apart in your salad. Do not over cook them for that reason as well, you want them to hold their shape in your bowl. You know they are done by inserting a sharp knife (non-serrated) into a piece of potato and then trying to lift the potato out of the water- if it falls off readily, they are done. If the potato breaks in half at the piercing, you over did it a little. If the potato gets all the way out of the water and is not falling off- they need a bit longer.
While the taters are cooking, I created my dressing for the salad. I used mayonnaise, sour cream and buttermilk in a ratio of about 3:2:1- maybe not quite that heavy on the mayo. Then I added a couple tablespoons of dijon mustard and about a tablespoon of sweet relish. I really like the tanginess that the dijon, relish, buttermilk and sour cream add, while keeping with the creamy, richness of mayo. For more flavor, some salt and pepper and a good bit of fresh dill. I have recently found some dried dill that is still nice and green in the jar and almost as good as the fresh version, so if you have that instead, go for it. There are certainly other herbs that could be employed, but for me, dill makes potato salad. Hard cooked eggs are traditional as well, but this time around I left them out. Honestly, I didn't miss them, but that doesn't mean I don't think they belong here.
When prepping my veggie add-ins, it really depends on what I have on hand and what looks good. I happen to get some gorgeous tri-colored radishes from a farm in Hadley, MA that my local produce store had this week. I love the color and crunch they added. Then some usual suspects : carrots, cucumber, and tomato. For the cucumber I used Romanian cucumbers that are very small and sweet but require no peeling or seeding. I used grape tomatoes, cut in half, but didn't add them until most of the combining and mixing was done, so as not to smash them. I like to have some onion flavor, but wasn't sure how others felt about biting into pieces of raw onion, so I used a good bunch of scallions instead.
Let the potatoes cool a bit in the colander before adding them to your dressing- to avoid any unpleasantries with warmed mayonnaise. Be sure to put the whole thing directly into the fridge to cool it down before serving and try not to leave it out of the fridge too long during a dinner party (room temperature and dairy + egg products just aren't safe for too long). I usually leave my final tasting until after it's chilled as well because you'll find some of the flavors mellow out in that time, while others develop, so you may need to add a bit more salt or other ingredient to get it just right. Be careful not to over salt at the first tasting before this resting period. If you are serving for a party and want to make it look extra special, some slices of hard boiled egg, alternated with slices of cucumber and/or tomato on top is very pretty.
Thursday, May 21, 2009
Chicken and Broccoli "Alfredo"
I have an abundance of chicken breasts in the freezer at the moment and was starting to run out of my usual go-to meals. Then I thought of chicken and broccoli alfredo. This is a dish I occasionally order out at restaurants (when was it exactly that this became a staple on virtually all middle of the road American restaurants?), but realized I had never actually made it at home. I thought to myself "why not?", it's not like it's really that complicated. Perhaps it was the term "alfredo" that scared me. Not sure why. A classic alfredo from Rome is nothing more than butter and parmesan cheese melted together and used to coat pasta. Of course in American restaurants things like garlic, cream, chicken or shrimp and vegetables are pretty much standard additions.
For my "alfredo" sauce, I started with some butter and olive oil in a large pan. Then I added a bit of flour, making a roux to thicken some skim milk and half and half. When I had that at a good consistency (not super thick, knowing what came next), I added some parmesan cheese. To flavor it up a bit I added a little salt and pepper, and a pinch of freshly grated nutmeg. I love nutmeg (only freshly grated with this spice will do for me) and knowing how well it goes in something like a creamy gratin, I figured I'd add it.
The chicken I cooked on my little indoor grill with some garlic and herb spice on it. I like the texture the grilling added- giving the chicken a slightly charred outer coating, plus the flavor of the herb mix. I think it was a little more exciting that just cooking the chicken in the pan before building the sauce. I left the breasts whole for grilling and chopped them into bite sized pieces once cool enough to handle, then added them to the sauce.
The broccoli came from a bag of frozen broccoli florets that I put in the microwave with some plastic wrap on top of a big glass bowl (to help hold the steam in and cook them faster). I left them a bit under done, and let them finish up in the hot sauce.
Traditionally, you might see fettucini with alfredo sauce, or often a penne when you get it in an American restaurant with broccoli and chicken, but I happen to have some farfalle in my pantry and thought it would look pretty, plus still hold the sauce well. I don't often use farfalle because sometimes I find it hard to get the pinched inside of the bow to be cooked without the outer edges of it falling apart. It's just the nature of the shape I think, but they sure do look nice when it works out.
Tuesday, May 19, 2009
Adventures in Pineapple
I had a can of pineapple chunks in my pantry for a while, that just decided to "speak" to me this week.
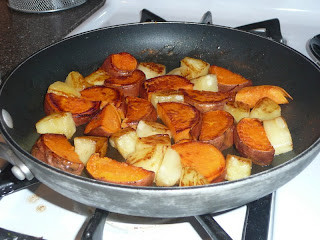
My first use of half the can was with some sweet potato. I thought of these two together from a sweet potato and pineapple casserole that I made once as a vegetarian side dish option for a holiday party. Wanting that same flavor profile, without the use of the oven was my basic idea. I thought the use of a bit of butter and some caramelization in a pan would make for a very nice side dish for dinner. I partially cooked the sweet potato in the microwave- leaving it whole and just poking it a couple times to let the steam out. It was important not to cook it too much, or it would not slice into the pieces I wanted for the dish. After melting some butter in a frying pan, I added the pieces of potato and pineapple chunks, with a bit of their juice. Once one side was nice and browned, I flipped each piece over to get the same effect on the other side.
The result looked very nice, but I felt there was something a little lacking. The pineapple had gotten quite concentrated in flavor with the process and was almost too sour. When eating with the sweet, creaminess of a piece of potato in the same bite, it worked well. Perhaps if it had a little bit of sauce or the pieces were smaller and therefore you would most likely eat small pieces of both in each bite. It's a little bit of a work in progress. Fresh pineapple, as opposed to canned, may also change things.
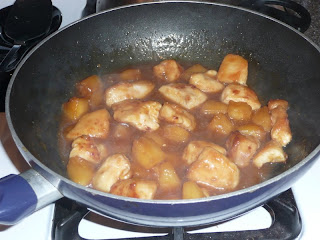
My second adventure with the other half of the pineapple can involved an asian-influenced chicken with pineapple dish. This time I started with some large bite-sized pieces of chicken and dredged them in some flour before cooking them in butter and olive oil. I wanted just a little bit of a crispy, brown coating to them. When they were cooked through, I removed them from the pan and created a pineapple sauce. I dumped the rest of the pineapple chunks and their juice in the pan, plus the juice and pulp from one orange, and a bit of teriyaki marinade I had in the fridge. I let it reduce a bit and thicken slightly, but wanted more than just a juicy sauce- I wanted it to really coat the chicken, so I added a little bit of a cornstarch slurry (cornstarch and water) while it was simmering to tighten it up. When it was at the consistency I wanted, I added the chicken into the pan and coated it with the sauce. Served with rice, it was very tasty. Erik said it may have been one of my best chicken concoctions to date (but he's a big fan of this type of thing).
Friday, May 8, 2009
Tonight's Version of Chili is...
I must thank my friend Liza for opening my eyes to chili when we lived together in college. Chili wasn't something that was made much in my home growing up and I was not what you'd call an "adventurous" eater as a child or young adult (but I'm getting there!). Since Liza's tutelage, chili has been a staple in my cooking repertoire and I've come to love it.
I decided to do a bit of research on what "chili" actually is and found a good summary on wikipedia. "Chili con carne (literally "Chili with meat", often known simply as chili) is a spicy stew made from chili peppers, meat, garlic, onions, and cumin. Traditional chili is made with chopped or ground beef. Variations, either geographic or by personal preference, may substitute different types of meat and may also include tomatoes, beans, or other ingredients." There was a lot more on the different regional adaptations of chili in the article, including a great quote "If you know beans about chili, you know chili ain't got no beans." I realize this is a bone of contention between chili-lovers, but I think the phrase "to each his own" when I think about chili. It's a great one-pot meal that can be a bit of a "catch-all" for what you have in the pantry or fridge that night. I think of chili as a concept of a dish, rather than a specific regimen. But then again, I don't live in Texas.
With this philosophy for making chili, my concoctions are never the same twice. Originally, when I relied heavily on McCormick's Chili seasoning packet, many of my pots were similar. These days, I've thrown away reliance on the packet and head to my spice shelves looking for inspiration. I couldn't tell you all the additions and measurements of what went into this particular pot, but I know it included chili powder, smoked paprika, Old Bay, cinnamon and some Ms. Dash blend (ok, maybe I still buy some seasoning mixes). I was horrified to find my cumin empty- apparently my mental note about using that up didn't compute. But that just makes it more fun and why I went with the Old Bay for something different. I also had chives and oregano sprouting in my herb pots, so threw some of those in as well. Of course salt and pepper are in the mix, as well as just a bit of sugar to help with the acidity of the canned tomatoes- which brings me to what else is in there.
Ground turkey was on sale this week, so that is my meat instead of ground beef. I know, I know, another cardinal sin from Texas, but it is healthier and was cheaper than beef. The rest of what's in there may be considered "fillers" by some, and will definitely get you disqualified from a chili cook-off, but I think of them not as filler but textural, nutritional and down right tasty enhancements. I chopped some onions and red bell pepper to start with, and added some halved grape tomatoes (because I had them and they needed to be eaten) and some canned stewed tomatoes. Then I used dark red kidney beans and small red beans and also threw in some frozen corn because I like the bit of sweetness and color it adds to the party. There needed to be more sauciness so I added an 8 ounce can of tomato sauce. Often I will also add about half a beer for the sauce (another Liza hand-me-down), but didn't have any in the fridge. (See, it's not about planning it's just about spontaneous chili cooking!)
I like to let things simmer together for at least an hour to marry all the flavors and get a good, rich feel. To finish things off, I'm a fan of some sour cream, cheese and usually scallions, but I didn't have them, so it was more chives from my herb pot.
Maybe this won't win any Texas chili competitions (because it couldn't even be entered) but I still think it makes a dang good dinner, ya'll.
Thursday, May 7, 2009
Torturous French Toast
This French Toast was torturous for Erik, not me, who ate it :) Here's the story:
We had some baguette-type rolls in the house for a night of sausage, peppers and onions for dinner and there was an odd amount of rolls in the package, leaving one left after the dinner meal. A couple days later, the roll was a bit stale. I decided it would make yummy French Toast and started slicing it appropriately. That morning, Erik had to take all our leaf bags out to the curb along with the garbage and he came in complaining he was hungry (he normally eats at work and has a stash of breakfast stuff there). So I handed him one of the little round ends of the bread, which wouldn't sit well in a pan for French Toast. He ate that one, then went over to my bread to grab another of the nice slices to which I protested "No! That's for my French Toast!" but gave him the other rounded end piece. His response was a shocked and terribly disappointed look and he said "now I'll be tortured thinking about all the things I miss when I'm gone." Poor Hubby. Not to worry, he'll get his French Toast this weekend.
This batch of French Toast was, in fact, amazing. I put half and half, cinnamon and vanilla extract into the egg mixture and let the slices soak for several minutes on each side until they were quite gooey in the centers, but the crust was still holding together. I cooked them in a pan with some butter, but also covered them for a little while since they were thick, just to make sure they were totally done. They came out soft on the inside and crispy on the outside. Such a weekday treat!
Monday, May 4, 2009
"A Good Head of Cauliflower"
This post is dedicated to Lena who recently said "there's no such thing as a good head of cauliflower" when I was poking fun that she only likes green vegetables. Lena, this one's for you!
I had a head of cauliflower in the fridge that needed to be eaten before it started turning brown, and I decided to get away from the obvious choice of steaming it and thn drowning it in cheese sauce. Tasty for sure, but a bit boring and calorie heavy. I decided instead to saute it with garlic, olive oil and a bit of butter. The garlic was not chopped, but just broken into a couple large piece per clove- from smacking it with the side of my knife to get the peel off. I used about 3-4 cloves. I also seasoned with salt and pepper. The cauliflower was beautifully browned and carmelized and infused with all the flavor of the garlic, oil and butter. The garlic pieces were soft and sweet. It was a fantastic side dish. Even Erik (who isn't a huge fan of the vegetable) ate it all off his plate. I have to quote him too "you could make poop taste good"... "I hoped you don't take that the wrong way and think I'm comparing your food to poop." Thanks, sweetie.
I also looked up cauliflower's nutritional value and found this:
This food is very low in Saturated Fat and Cholesterol. It is also a good source of Protein, Thiamin, Riboflavin, Niacin, Magnesium and Phosphorus, and a very good source of Dietary Fiber, Vitamin C, Vitamin K, Vitamin B6, Folate, Pantothenic Acid, Potassium and Manganese.
Who knew it had protein in it?
Subscribe to:
Posts (Atom)